
If you wish to have your own webpage without having to buy a domain, you would love QR Cloud’s QR Pages feature. This unique offering allows you to create mobile friendly webpages with just your QR Cloud subscription. That means you don’t have to purchase a separate domain or hosting to have the professional link in bio you’ve always wanted to have.
If you want to know more about this unique offering from QR Cloud, let’s dive in.
What are QR Pages?
A QR Page is a multi-function mobile-optimized landing page that you can build using QR Cloud. It can serve as the source of information for your dynamic QR Code, enabling you to change the content of your QR Code without having to print a new one.
Where To Use QR Pages
There are so many ways to use QR Pages. Here are just some:
- Link in Bio. Have you seen the people you follow on social media with a link in bio on their profile? Well, you can have one using a QR Page. For this article, we’re going to create a QR Page that will serve as your link in bio so if you’re interested, definitely keep on reading!
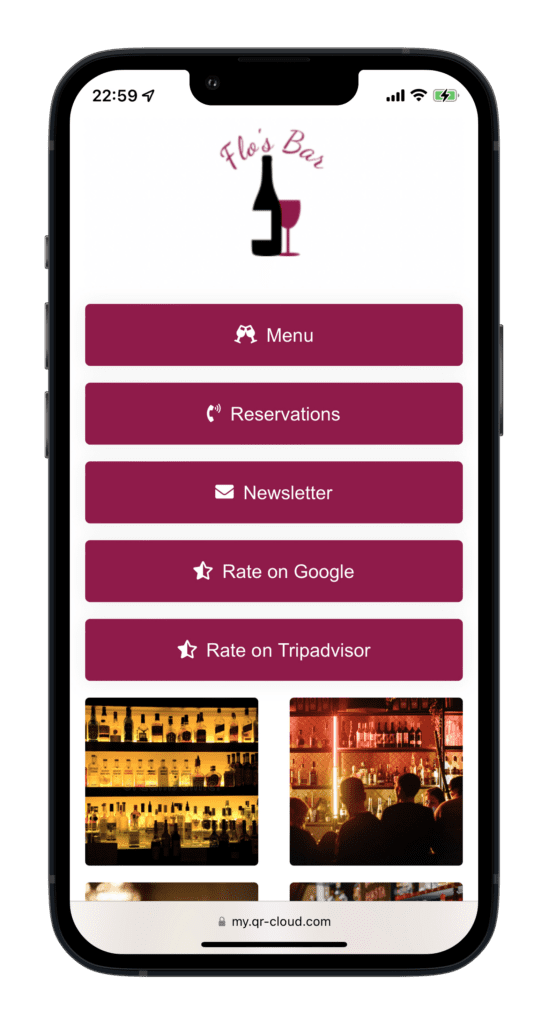
- Landing Page. Say for example you have a restaurant and you create a QR Page that will serve as its landing page. You can add a menu, manage orders, get people to sign up to future promos and special offers, accept payments via PayPal and much more.
- Replacement for Your Webpage. Because of the customization and wide array of options on what you can include, your QR Page can well replace your own webpage.
What’s most remarkable about QR Pages is that it can provide information on your dynamic QR Code.
You can use your QR Page as the ever-changing source of content for your singular QR Code. You can change your landing pages, add features, and more anytime you want without having to generate and print out a new QR Code. How convenient is that?
How To Make QR Pages
For the purpose of this step-by-step tutorial, suppose you want to create a Link in Bio similar to the ones you see on the profiles of the people you’re following on social media. Now, let’s make you a landing page.
Create Your Page
- Log-in to your QR Cloud account.
- On your Dashboard, click Create Link and choose QR Page (purple) from the dropdown menu.
- On the pop-up, you can type in a short URL for your page. Alternatively, you may leave it blank for a system-generated URL. As for me, I prefer a custom URL for a bit of personality.
- Click QR Page.
Your QR Page is ready! Now, let’s get ready to customize your professional landing page.
Settings
There are two tabs on the Settings page: Settings and Blocks. In Settings, we can change our short URL, customize how our QR Page looks, request for verification, add or remove branding, manage SEO and UTM Parameters, choose our font, and enable protection.
Let’s take a look at some of the options you would love:
- Short URL. If you chose to let QR Cloud generate a short URL for you, you can rest assured that you can still have a customized URL for your QR Page. Simply type in the new short URL you want and you have your new professional-sounding (or quirky-sounding – it’s up to you) link.
- Customization. On the Customization tab, you can select the background color (also fully customizable) or image for your QR Page. You can even add Favicon (an icon that appears next to your URL on the browser) to further personalize your page.
- Fonts. Fonts and font size play a huge role in the overall look of your QR Page. Here at QR Cloud, you can choose from 10 font options as well as toggle the font size.
- Protection. You can set a password for any reason you might want to restrict access to your QR Page. You can also add a sensitive content warning to protect your visitors from viewing unwanted content.
- Advanced. Say that one day you decide that you want to direct your users to another link (for instance, your freelance platform URL), you can do so by simply encoding your new link on the Leap Link URL pane. If you want your link to direct users to your QR Page instead, leave it blank.
Remember that you don’t have to fill out all the settings. If you don’t want to modify the current settings, simply leave them blank. Also, don’t forget to click Update or your new settings won’t be saved!
Now that we have managed the Settings of our QR Page, let’s put some things on our QR Page, shall we?
Blocks
Blocks are the stuff that visitors can find on your QR Page. Here’s how to add them:
- Click the Blocks tab.
- Click the Add Block button.
- A pop up will appear where you can choose which blocks you want. You can add as much or as little as you want out of the 26 options. Rearrange the blocks by dragging them up or down. Change the names of the blocks as you want them to appear on your site. (This is useful if you have multiple blocks of the same type.) Once satisfied with how your QR Page looks, you’re done!
Options for QR Page Blocks
As mentioned, there are 26 types of blocks to choose from. You can choose whatever you want – it’s your QR Page, after all! Here are some that you’d find useful:
- Heading. The Heading block is where you put the title of your QR Page, letting your visitors know for sure that they are in the right place.
- Paragraph. You can also add a Paragraph after your Heading. This may be your job title or the services you offer or a simple welcome note. You can add as many paragraphs – and actually any Block – as you want.
- URL. If you have a personal website, a portfolio site, or a link at a freelance platform, you can add them on your QR Page with the URL block.
- Email Collector. Let’s say you have a newsletter. Or you are a merchant who wants to get customers to have first dibs on promos and special offers. The Email Collector block allows visitors to sign up with their email address and name.
- Twitter Tweets and Instagram Feed. Let your visitors see your tweets and IG feed without leaving your QR Page.
Of course, these are just some of your options. You can choose to add your YouTube or streaming channel, podcast, etc. It’s your QR Page – you’re free to do what you want!
If you’re satisfied with the way your modifications look, you can simply go back to your Dashboard and your QR Page is automatically updated.
Before You Go
You’ve now learned about the QR Page feature of QR Cloud. Before you go, here are a couple of questions you might want to ask:
The QR Page feature comes with the Pro and Expert Plans. You don’t have to worry though, because given its awesome features, QR Cloud plans are quite affordable. If you want to give QR Pages a try before deciding to buy a plan, the Free Plan includes a 7-day Pro-trial.
To get verified, you may contact us at admin@qrcodes.at. Good luck!
-
Previous Post
Static and Dynamic QR Code: Which is Better?
-
Next Post
QR Code for Charity Donations